Quick Start#
This first chapter is a quick introduction to building applications with Open Dylan.
Starting work with Open Dylan#
In this section, you will start Open Dylan’s development environment, and choose one of several supplied examples to work with.
Start the Open Dylan environment.
You can do this by choosing the Start menu shortcut Start > Programs > Open Dylan > Open Dylan. Open Dylan will also start if you open any file associated with it, such as a Dylan source file.
When Open Dylan starts, the main window appears:

The Open Dylan main window#
The initial dialog also appears:
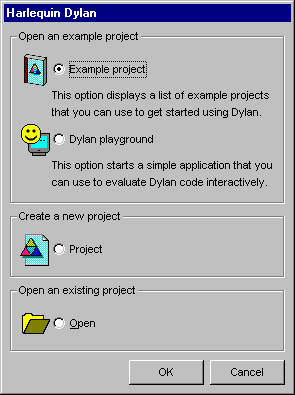
The initial dialog#
The main window will be present throughout your Open Dylan session. It provides a way to set environment-wide options and to control the display of all Dylan windows. To exit Open Dylan, choose File > Exit in the main window.
The initial dialog is there to help you get working quickly, whether by looking at an example project, creating a new project, opening an existing project or text file, or starting an interactive Dylan session in the Dylan playground. (See Interaction basics using the Dylan playground for more information.)
We want to browse the example projects.
Select the “Example project” option and click OK.
The Open Example Project dialog appears.
The Open Example Project dialog shows several categories of example Dylan project. If you expand a category you can see the examples offered.
The “Getting Started” category contains two very simple projects to help you start programming in Dylan and using the libraries included with Open Dylan. The “Documentation” category contains examples from the Open Dylan documentation set.
The source files for the example projects are stored under the top-level Open Dylan installation folder, in the subfolder Examples. Each example has its own project folder. The files that Open Dylan creates when building a project are also stored under this folder.
We are going to look at the example called Reversi, which is in the “Documentation” category.

The Open Dylan Examples dialog#
Expand the “Documentation” category by clicking the + next to it.
Select “Reversi”, then click OK.
A project window appears.
The project window is one of four programming tools in Open Dylan. The other tools are the browser, the editor, and the debugger.
The project window#
In the project window you can see the project that you are working on. A project represents a Dylan library under development. We look at projects in more detail in Creating and Using Projects.

The Open Dylan project window.#
Projects are a key concept in Open Dylan. Virtually all programming tasks you can carry out in Open Dylan take place in the context of a project. (An exception is editing text files: you can edit a text file without its being part of a project.)
Every time you open a project, or create a new one, Open Dylan displays it in a project window. If you have more than one project open at a time, each is displayed in a separate window.
You will use the project window frequently during development. Some of the things you can do in or begin from the project window are:
Building, running, and interacting with applications.
Editing source files.
Browsing warnings generated when a project was last built.
Browsing the classes, functions, variables, and so on that a project defines.
Browsing the libraries used by a project.
Browsing and setting breakpoints on source code.
In short, the project window is a focal point for work in Open Dylan.
The Reversi project#
The project window that is now on your screen has several pages of information about the project Reversi. This project represents a Dylan library called Reversi that can be built into an executable application. Reversi implements a popular board game.
The default view in the project window is the Sources page, which displays the source files that the project contains. We can see that the Reversi project contains six source files. These files include definition files for the Reversi library and the modules it exports—library.dylan and module.dylan respectively. Later, we will add some more files to the project to implement new game features.
Building an executable application#
We can use the project window to build an executable application from the Reversi project.
This will be a normal Windows executable file with an EXE extension. Open Dylan puts the files it builds in a subfolder of your top-level Open Dylan installation folder, devoted to the Reversi project. We will see more about where projects and their build products reside on disk in Projects on disk.
Building Reversi#
To build an executable application for a project, choose Project > Build in its project window.
Choose Project > Build in the Reversi project window.
Open Dylan starts building the application. A progress indicator window appears.

The build progress indicator.#
Because we have never built the Reversi application before, Open Dylan examines and compiles every source file. When compilation is finished, it links the compiled files together with the system libraries that the application uses, and creates an executable file. Before it does that, however, a dialog appears.
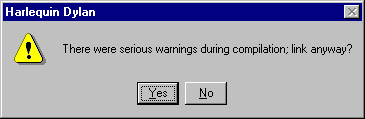
The link warning dialog.#
The dialog appears to let us know that the compiler issued serious warnings while compiling the project sources, and to let us choose whether to go ahead with the “link” phase of building. The “link” phase creates the executable application for the project.
Why are there serious warnings? Recall from The Reversi project that we will be adding some more source files to the project later on. These files implement new game features that require debugging and will help to demonstrate the Open Dylan development environment further. Because we built the project without adding the extra files, the compiler detected that some code in the project refers to name bindings that were otherwise undefined, and issued the serious warnings.
If there are serious warnings when compiling a project, we will usually want to fix the code first before trying to run the application. But sometimes it is useful to be able to execute an application that is only partly finished. As long as we know that the code containing the references to the undefined bindings is not going to be executed, we can safely test the rest of the application.
Reversi has been carefully coded to avoid calling these undefined names until the files containing their definitions are included in the project and the project is rebuilt. So there is no harm in building an executable for Reversi.
If we click Yes in the link warning dialog, an executable is created; if we click No, building stops. In either case, the serious warnings are recorded in the project window’s Warnings page.
Click Yes in the link warning dialog.
Open Dylan links an executable for Reversi.
Running Reversi#
Now that the application is built, we can run it. The project window menu command Application > Start runs the most recently built executable for that window’s project.
Choose Application > Start and the Reversi application window appears.

The Reversi application.#
The Reversi application is now up and running.
When you choose Application > Start, the executable starts, runs, and terminates normally, but at the same time it has an invisible connection to the Open Dylan debugger. This means you can pause execution at any time to debug the application and even interact with it. (Use Application > Pause to do this.) In addition, if there is an unhandled error inside the application, the debugger will catch it automatically so that you can examine it. We will learn more about the debugger later, in Problems at run time and also in Debugging and Interactive Development.
Three ways of running Dylan applications#
There are three ways we can run the Reversi application we have just built. The first is to choose Application > Start from the Reversi project window, as we have just seen. This menu command is also available in the Open Dylan debugger and editor.
The second way to run the application is to click the “Start/Resume”
button ( ) on the project window’s toolbar. Again, we can do
this in the Open Dylan debugger and editor too. And again like
Application > Start, running an application this way connects it to
the debugger, so that any unhandled errors are caught and we can pause
and interact with the application.
) on the project window’s toolbar. Again, we can do
this in the Open Dylan debugger and editor too. And again like
Application > Start, running an application this way connects it to
the debugger, so that any unhandled errors are caught and we can pause
and interact with the application.
Finally, we can run the application from outside Open Dylan as we would any other executable application file—such as by typing its file name into an MS-DOS console window, or double-clicking on it in an Explorer window. If we run an application this way, Open Dylan cannot connect a debugger to it. Any unhandled errors could therefore crash the application, which we would not be able to pause and interact with in the paused context.
Looking at definitions and expressions#
Each file listed on the Sources page of the Reversi project window is now preceded by a + symbol. This means we can now expand a file name to reveal a list of all the Dylan definitions and top-level expressions in that file.
In the Reversi project window, select the Sources page.
Expand the algorithms.dylan item by clicking the + next to it.
The definitions and expressions are sorted alphabetically under the file
name in which they appear. Definitions are the Dylan name bindings
created by compiling top-level definitions in the source code that the
file contains. Thus define class causes a class name to appear in
the list of definitions, define method a method name, and so on, but
the names of accessors on a class’s slots do not appear.
The expressions in the list are, roughly speaking, anything that appears
at top level in the source file but is not a definition. Typically such
expressions are assignments to global variables or function calls. For
example, in the listing for algorithms.dylan, there are several
top-level calls to the method install-algorithm, which stores values
in a globally visible table. Expressions that are part of a larger
expression, or part of a definition, are not shown.
In addition to the normal Dylan syntactic conventions—a leading dollar
sign for a constant, enclosure in angle brackets for a class, and so
on—icons appear next to definition names to indicate the kind of Dylan
object to which the names are bound. Constants, for example, are
indicated by an octagonal icon containing a stylized dollar sign
( ). Expressions are indicated by a green octagon (
 ).
).
You can also see definitions (but not expressions) listed by library and module on the Definitions page. This page includes a facility for filtering definitions out of the visible list according to their type or whether their name contains a given string.
These lists are just one use to which the Open Dylan environment puts its compiler database, a rich collection of information that the compiler derives from every project it builds.
The fact that the compiler database is derived during compilation explains why the file names in the Sources page were not expandable when we first opened the Reversi project, and also why we would have seen that the Definitions page was empty at that time. The compiler database for Reversi did not exist until after we built the Reversi application. However, when we open the Reversi project in future sessions, Open Dylan will read in the database from disk.
Compiler databases are mostly used by the browser tool, which we will look at later. See Compiler databases for more details of the compiler database and Learning More About an Application for details of the browser.
Building DLLs#
By default, Open Dylan projects are built into executable applications (.EXE files), but with a simple setting we make them be built into dynamic-link libraries (.DLL files).
This option is just one that we can change in the project window’s Project > Settings dialog. From that dialog we can also set compiler optimizations, project version information, and command-line arguments for console applications. For more details, see Project settings.
Making changes to an application#
We will now make a change to the Reversi application. We are going to add a new feature that allows someone playing Reversi to change the shape of the pieces.
If you look at the Reversi application again now, you will see that some of the commands on the Options menu—Circles, Squares and Triangles —are unavailable. Our changes will enable these items.
Among the Reversi example files, there is a prepared Dylan source file with the changes we need for this new piece-shapes code. It is not yet a part of the project, so to incorporate it into our Reversi application, we must add it to the project.
Exit Reversi by selecting File > Exit from the Reversi application window.
You can also tell the environment to terminate a running application using Application > Stop or the project window’s stop button (
 ).
When you ask to terminate an application in this way, the environment
asks you for confirmation, to prevent application state being lost by
accident.
).
When you ask to terminate an application in this way, the environment
asks you for confirmation, to prevent application state being lost by
accident.In the Reversi project window, select the Sources page.
The positions of files in the sources list are important. The last file in the list should always be the file that contains the code that starts the application running. Unlike C or Java, Dylan does not require us to write a function of a predetermined name in order to start an application. We simply make the last piece of code in the last source file an expression that does something with all the Dylan definitions that the source files contain.
In the Reversi project, start-reversi.dylan contains the code that starts the application and so must be at the bottom of the source file list. We want the file we are going to add to appear between board.dylan and start-reversi.dylan.
Select board.dylan.
Choose Project > Insert File.
The Insert File into Project dialog appears.
In the Insert File into Project dialog, select piece-shapes.dylan and click Open.
Open Dylan adds piece-shapes.dylan below board.dylan.
Now that piece-shapes.dylan is part of the sources that will be used to build the Reversi application, we can rebuild the executable.
Choose Project > Build in the Reversi project window.
Open Dylan builds the application again.
This time, Open Dylan compiles only one file: piece-shapes.dylan. No changes had been made to the existing source files, so it did not need to recompile them. It simply linked the existing compiled files with the new one to make the new executable.
This incremental compilation feature can save a lot of time during development, when you want to rebuild your application after a small change in order to test its effects. Open Dylan automatically works out which files it needs to recompile and which it does not. The compiler also updates a project’s database during incremental compilation.
When compilation of piece-shapes.dylan is complete, there are still some serious warnings. The link warning dialog appears to ask you to confirm that you want to link an executable for Reversi.
Click Yes in the link warning dialog.
We can now run the new version of Reversi.
Choose Application > Start in the Reversi project window.
A new Reversi application window appears.
In the Reversi application, select the Options menu.
Thanks to our compiling the changes to the project, the Circles, Squares, and Triangles items are now available:

The Reversi application’s Options menu after the code changes.#
Choose Squares.
The Reversi application updates the board, laying the pieces out again as squares rather than circles.

The Reversi application with square pieces.#